How to Use Todoist to Manage Your Commitments Both at Home and at Work
(A Todoist Tutorial)
You are someone who would like to get better at keeping the commitments you make to others whether it is at home or at work. Whether it is seeing a team project through from start to finish, or it is organizing a brunch party with your friends, you need a system that will help you manage it all.
I have personally been using Todoist for almost a year. Not only has it helped me keep track of all of my commitments, but it has transformed the way that I operate and organize day to day tasks both at home and at work.
In this article, you will learn exactly how to use Todoist to manage all of your commitments, both work and personal. Todoist is a very powerful task management tool that can help transform the way you get stuff done.
Try out Todoist Pro free for 2 months!
The Getting Things Done Method
You may have heard of the Getting Things Done Method coined by David Allen in his book, Getting Things Done. It is a “personal productivity methodology that redefines how you approach your life and work.”
I personally like, and highly recommend, the way that Jordan Raynor has captured this method in his book, Redeeming Your Time because he also shares a lot of great time management tips in general so you can truly become excellent not just at managing your time, but become excellent in your work as well.
Both processes are very similar. Here is a quick breakdown of the method.
It happens in 5 steps:
Step 1 – Capture Open Loops
Open loops are simply tasks you have made a commitment to at any level.
Write, record, or gather any and everything that has your attention, or that you’ve made a commitment to into a commitment tracking tool.
Step 2 – Clarify
Process what the commitment means. Is it actionable? If so, decide the next action and project (if more than one action is required). If not, decide if it is trash, reference, or something to put on hold.
Step 3 – Organize
Categorize it by creating projects, labels, priority levels, and reminders for each commitment you have made. This is also when you get to decide if it is something you need to delegate.
Step 4 – Reflect
Come back to your commitment tracking tool often to review and make sure you are making progress on your top priorities.
Step 5 – Engage
Take action!
When you dedicate yourself to using this system it will help you gain clarity over what you need to do now and what you need to do next depending on your level of commitment to each task.
In this article, you will learn how to use Todoist using the getting things done method. That way you can live with less stress and more control over your time!

What is Todoist?
Todoist is more than just a to-do list app, productivity tool, or task manager. Todoist is a commitment tracking system (CTS) that helps you organize your personal life as well as your work life. It can help you stay organized as you complete projects both big and small or any area of work or play.
This awesome project management tool can be used on both your computer as well as a mobile phone through their wonderful and easy to use app. I personally recommend using Todoist on your computer as well as your phone.
How Much Does Todoist Cost?
Todoist has three different plans depending on your needs, including a free version, and a premium version. You can try the Pro Plan for free for 2 months here.
Free (For Starters):
Cost – Free
Active Projects – 5
Collaborators Per Project – 5
File Upload Space – 5 MB
Filters – 3
Active History – Up to 1 Week
Pro (For Power Users):
Cost – $3/mo (billed annually) or $4/mo (billed monthly)
Active Projects – 300
Collaborators Per Project – 25
File Upload Space – 100 MB
Filters – 150
Active History – Unlimited
Other Perks – Reminders, Themes, Auto Backups, and Priority Support
Business (For Teams):
Cost – $5/mo (billed annually) or $6/mo (billed monthly)
Active Projects – 500
Collaborators Per Project – 50
File Upload Space – 100 MB
Filters – 150 (per member)
Active History – Unlimited
Other Perks – Everything from Pro, a Team Inbox, Admin & Member Roles, and Team Billing
Where Can You Access Todoist?
Todoist has a desktop app as well as a mobile phone app (iPhone & Android) You can also access your Todoist account just by going to Todoist.com and logging in.
Todoist also has browser extensions for Chrome, Firefox, Microsoft Edge, and Safari.
You can access Todosit from your Apple Watch or Wear OS, as well as through an email extension for Gmail and Outlook.
How to Use Todoist to Manage Your Commitments
In this guide, I will take you step by step through how to use Todoist using the method laid out in Jordan Raynor’s book, Redeeming Your Time. For this method to work, you must commit to using one and only one commitment tracking tool.
In this tutorial, I will show you how to use Todoist to manage your commitments. It will take a bit of time to set up Todoist for the first time, and you will need to be dedicated to building up the habit of using Todoist to manage your commitments, but I promise if you do set aside the time and commit to using this system, it will truly help you manage all of your daily tasks as well as a major work project.
You can start out with a free account on Todoist, but to get the most out of this commitment tracking system, you’ll probably want to upgrade to a Pro membership. You can try the Pro Plan for free for 2 months here.
Once you have the system built, it won’t take much time for you to pop in and out of it throughout the day to see what needs to get done next!
Step 1 – Capture Open Loops
In this section, you will learn how to use Todoist to capture all of those open loops in your brain!
Open loops are simply those tasks we’ve made some kind of commitment to but haven’t done anything about them yet. They stay stuck in our heads as we try to not forget about them, and they ultimately are the source of a lot of anxiety.
Todoist Tasks
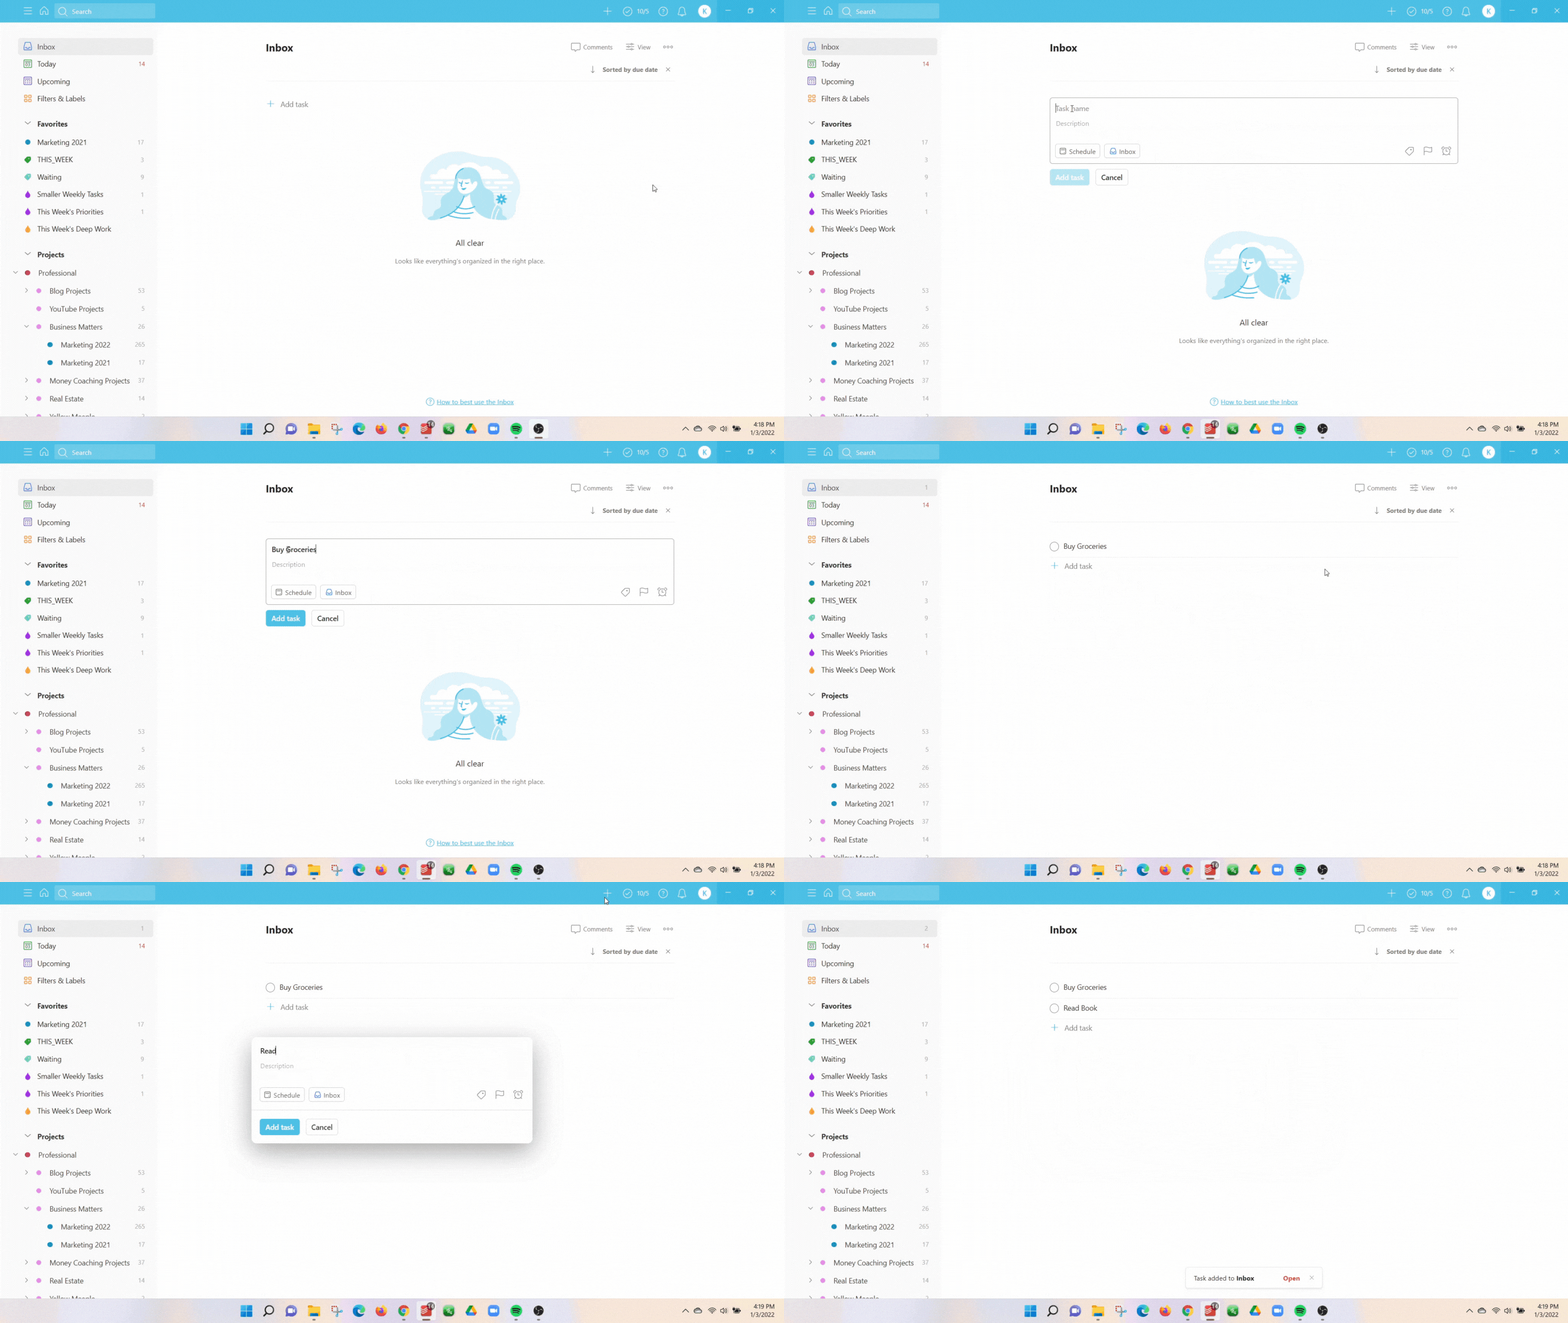
To relieve the stress of holding on to all the open loops in your head you need to get them out, and you need to put them all in one place. Rather than writing a couple down on a sticky note (like the grocery list) or in your paper planner, or starring an important email in your inbox, you need to dump all of those tasks into your Todoist app as a New Task
How To Add A New Task in Todoist
From The Computer
There are a few different ways to add a new task while on your computer.
- The “+” button at the top right hand side of the screen
- Keyboard shortcut, type “Q” for a quick add
- The “+ Add task” button at the bottom of every Todoist page
From the App
Simply click the big blue “+” button in the bottom right-hand corner of the app.
All new tasks will show up in your Todoist inbox.
NOTE: You can always move around your tasks simply by clicking and dragging them from the left-hand side of the task name.
Step 2 – Clarify & Define Your Commitments
After all of your commitments are turned into new tasks inside of Todoist it’s time to clarify and define each of them. Is this a one-action type of commitment? Or will it take multiple actions?
For example, if I add “Publish blog post ” as a new task I know that this is not just a one-step commitment. I need to research, write a rough draft, edit it, and then send it off to my virtual assistant to schedule.
In Todoist, I clarify and define this commitment by adding sub-tasks!
Todoist Sub-Tasks
Sub-tasks are a great way to make sure that all of your commitments are very clearly defined into actionable steps. For example, if you added “Husband’s Surprise Party” as one of your tasks, that can be broken down into smaller tasks – “Decide on Date,” “Create Guest List,” and “Create a Menu” might be a few of those sub tasks.
How to Create a Todoist Sub-Task
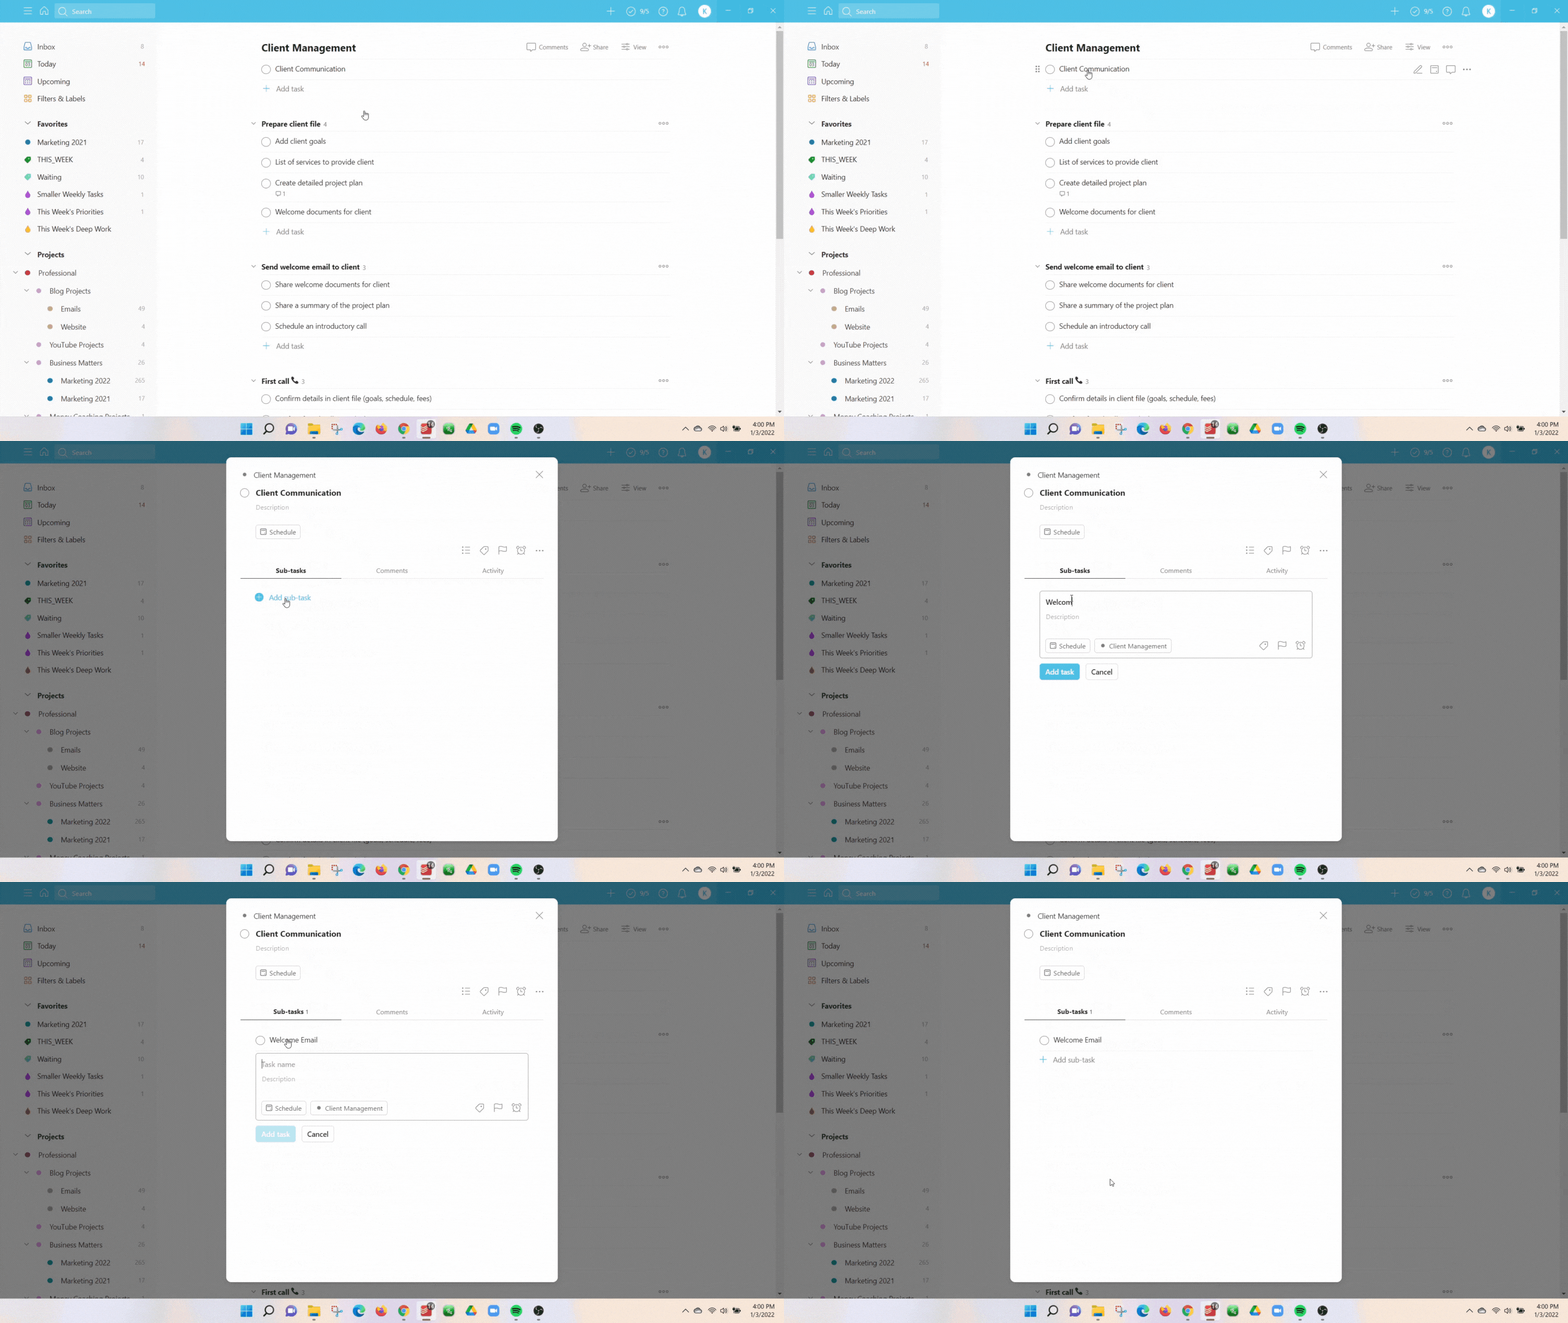
The easiest way to create a sub-task is to click on the task you would like to add a sub-task to.
At the bottom of the page that pops up, you will see the button that says “+ Add Sub-task.” Each sub-task can have its own due dates, tags, notes, and collaborators.
You can even add sub-tasks to your sub-tasks!
Step 3 – Organize
Now that you have defined your commitment it is time to organize it. Organizing your commitments in Todoist is important. Because at this moment you have one giant to do list and that can be very overwhelming. What you need to do is organize it so you know exactly what to do at this very moment without needing to sift through all of your projects one by one.
This can be done by organizing your tasks into projects, giving your task a label, a priority level, or even a due date.
Todoist Projects
The Projects feature in Todoist is a great way to manage and organize big or ongoing commitments (aka projects!)
If you have a task that has lots of steps to it, you may decide you’d like to create a project out of it. For example, if you are buying your first house there are many small steps that need to be completed before you can consider this commitment accomplished.
So you may decide to create a project and name it “Buy a House”
Another suggestion is to use Projects similar to how you might use Folder on your desktop computer or in your Email Inbox. For example, I have a Project called Errands and Chores. It is like having categorized to do lists.
Depending on the plan level you have purchased will determine how many different projects you are allowed to have. If you are a big projects person, I’d recommend the pro version of Todoist.
How to Create Todoist Projects
From the Computer
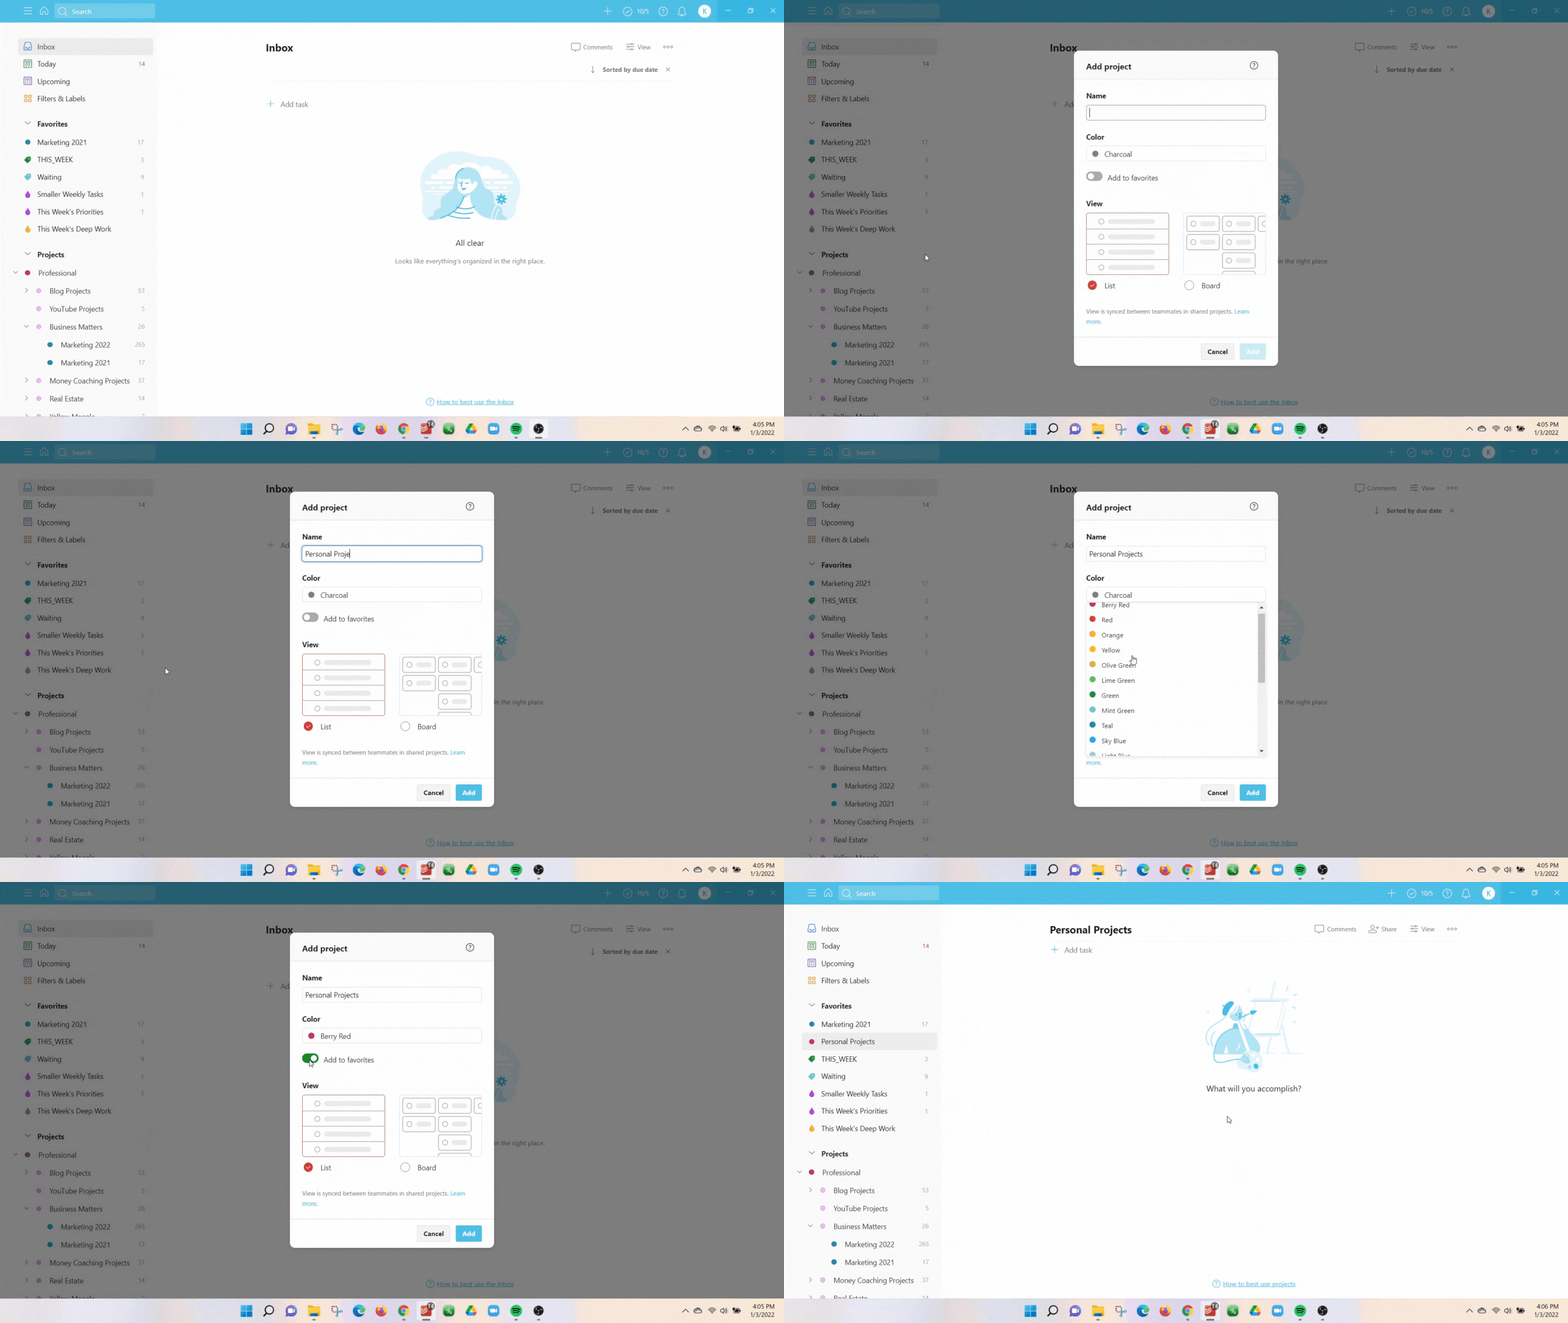
On the left-hand side, you will see the word “Projects.” Hover over it and then click the “+” button that will appear next to it.
Give your new project a name. For example “Write a Book.”
You can also pick a color to distinguish this project from the rest of the projects you will have.
If it’s an important project you will come back to often, you may want to select “Add to favorites.”
NOTE: This can always be done later by hovering over the particular project name, selecting the three dots that will appear to the right of the project name, and clicking “Add to favorites.”
Decide how you would like to view your project. Either as a list or a board. List is similar to your traditional task list, and if you are familiar with Trello, Todoist’s boards are similar to how Trello functions. Both are great for different reasons, so test them to find which you like more.
NOTE: This can also be changed later by going into the project and clicking the button in the top right-hand corner, “View.”
From the App
The process is very similar to doing it from a computer.
First, click the carrot button in the top left-hand corner to reveal the Todoist menu.
Scroll down to find Projects and click the “+” button to the right.
You will notice that there are actually a few extra options as you create your new project. These options include inviting a collaborator and selecting a parent project.
NOTE: You can always move around your projects in the menu simply by clicking and dragging them from the left-hand side of the project name. You can create parent projects this way as well. I recommend rearranging your projects to make sure your important projects are up top!
How to Assign a Task to an Existing Project in Todoist
From the Computer
There are a few different ways to do this.
- You can hover over a project and click the three dots to the right of the task name. Then click “Move to project”
- Open a task by clicking on it, and then clicking the button on the right hand side that looks like a list.
- Click into the the task name and add a # after the name. This will pull up all of your projects.
- You can also add a task directly to a project by going into the specific project you’d like it to be assigned to and creating a brand new task.
How to Create a Section in Your Project
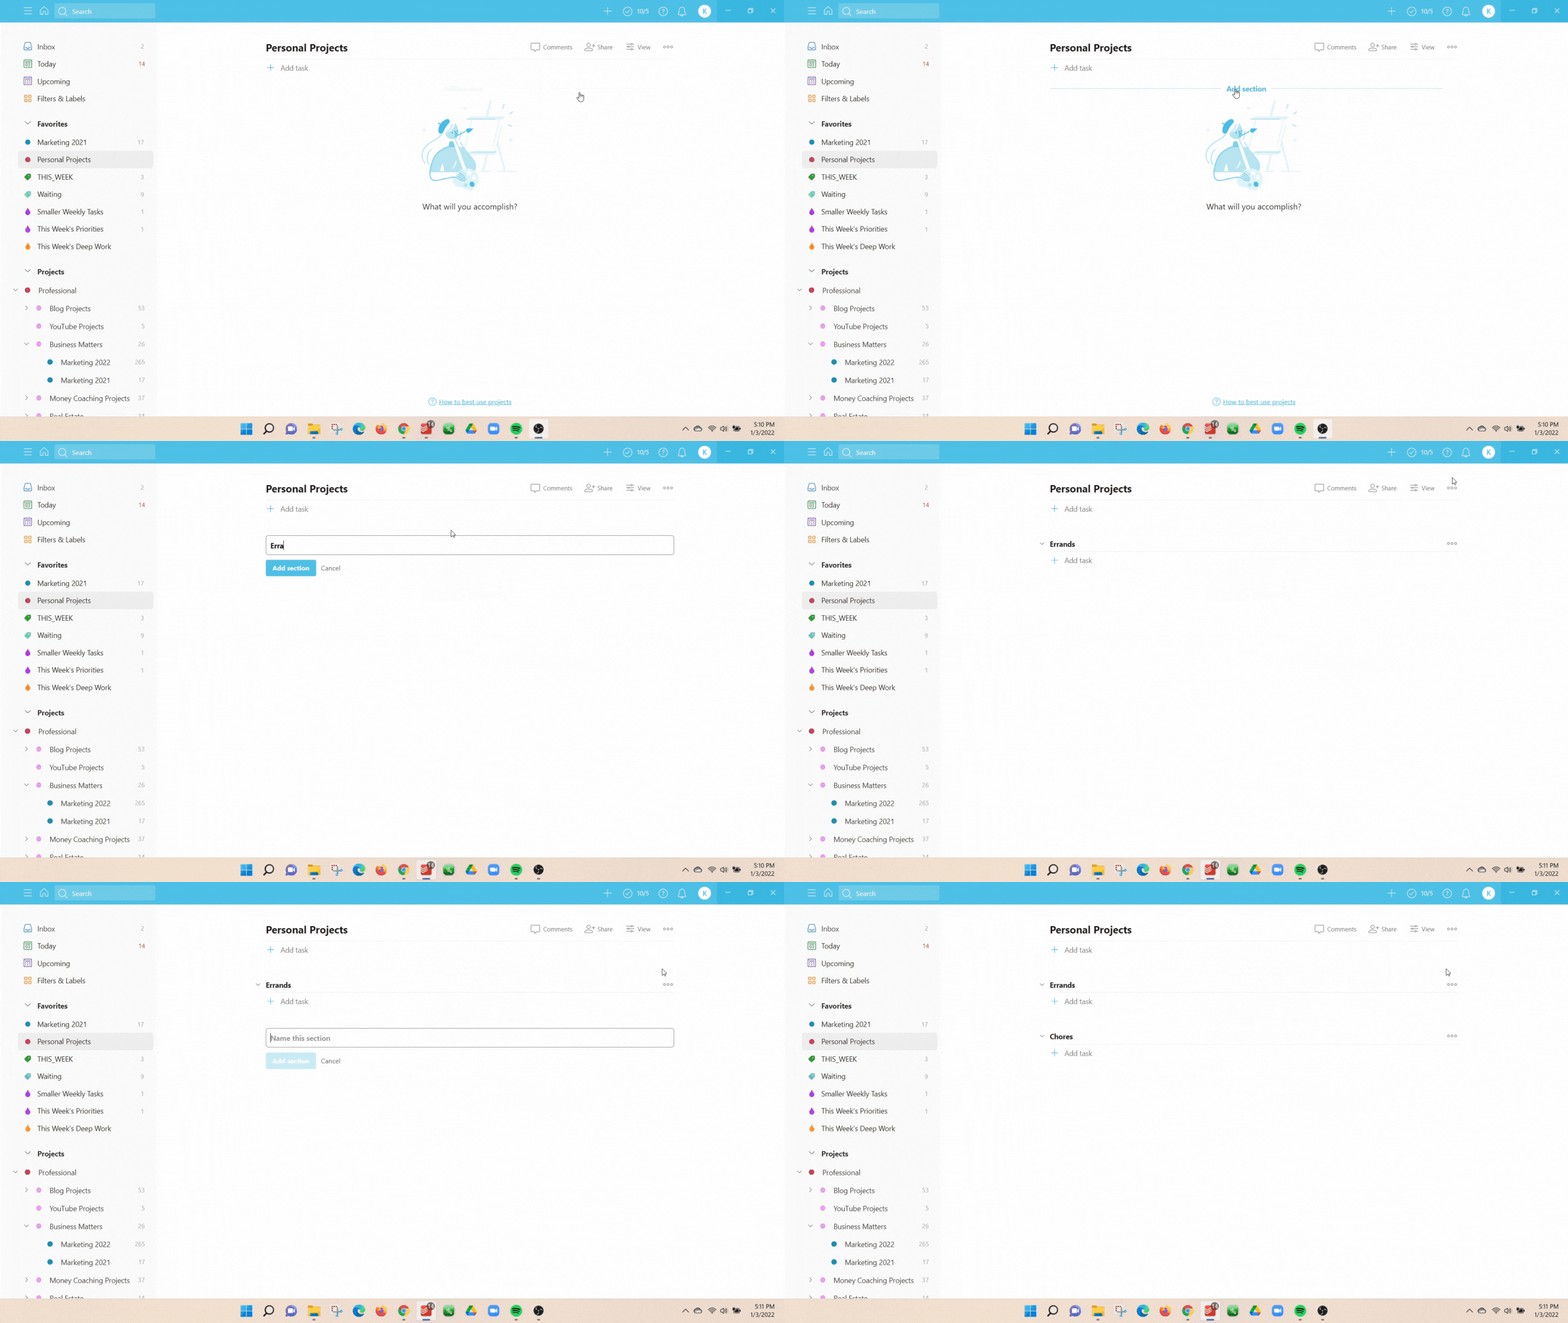
Inside of a project, you can create sections. Sections can be helpful for visually prioritizing, assigning, and clarification.
Adding a new section will depend on what view you have for your project already. If you are using the traditional list view, you will need to go to the top right hand of the project, click on the 3 dots, and click the button that says “Add section.”
If your project is in board view, you will see a slightly gray space that says “Add section.”
Some ideas for section headings would be
- By months that tasks need to be completed
- By people responsible for completing tasks
- Type of task
- Priority level of tasks
- Time it will take to complete a task
Todoist Deadlines
Another way to define your tasks is through deadlines. You can add deadlines to each of your tasks by scheduling when they need to be completed.
How to Schedule Tasks in Todoist
Scheduling tasks in Todoist can be as simple as typing in the deadline date as you type the name of a new task. For example, “Make Cookies by Friday” or “Call Doctor on January 18.” Todoist will automatically schedule your task based on what you type in.
Another way to add a date to a task is by clicking into the task and selecting the “Schedule” button. You can either type in the date, select one of the preset dates (Today, Tomorrow, Next Week, or This Weekend), or scroll through the calendar and click on the date you’d like.
Note: You can also add in specific times that the task needs to happen, like “at 3:30pm,” or even a general time, like “In the morning.”
How to Create Recurring Tasks
You probably have tasks that happen every day or every week. To quickly schedule recurring tasks, you can type “Every Day” as you create your new task. For example, “Work Out Every Day,” “Update Budget Each Friday,” or “Pay Electric Bill every 1st.”
Todoist will automatically schedule these tasks to recur on those days. This feature is super helpful for remembering to take care of your daily and weekly tasks.
How to View Your Tasks by Due Date
Todoist gives you two tabs to see your upcoming tasks that are due to be completed. The first is the “Today” tab. In the “Today” tab you will see all of your overdue tasks, as well as ones that are due today.
The other tab is “Upcoming.” In the upcoming view, you can select the date you’d like to see or simply scroll to see what tasks are due the next day.
Todoist Priority Flags
Another fantastic way to clarify which are your important tasks and which tasks are not as crucial to get done right away is to set a priority level.
How to Use Priority Flags in Todoist
There are 4 priority flag levels in Todoist.
- Priority 1: Red Flag
- Priority 2: Yellow Flag
- Priority 3: Blue Flag
- Priority 4: White Flag
To add a priority flag to your task, simply click into the task, then click on the small flag icon.
Priority 1 should be assigned to all of your tasks that are absolutely essential. I personally think that the best way to use priority levels is to reserve red flags for commitments that are non-negotiable and need to be done as soon as possible.
Note: Priority 4 is automatically assigned to any task that doesn’t have a 1-3 level priority assigned to it.
Todoist Labels
Another way to clarify your tasks and commitments is to give them labels. Labels are just another way to clarify, define, and keep track of all your commitments.
Some ideas on how to use labels for yourself:
- Amount of time the task will take
- Who is responsible for completing the task
- The location the task needs to happen
- The month the task needs to take place
- Priority level of tasks
- Type of tasks that it is (eg. read, watch, text, phone call, write, plan, research, etc)
I personally use a variety of these labels. For example, I like to label my small tasks like quick texts or phone calls that I need to make. That way when I have a couple of minutes between activities or time in the car, I can pull up that label and know exactly what tasks I can take care of with that time.
Same thing with time amounts. I like to label tasks that will take 5 minutes or less so I can quickly find things to check off when I have a little time before my next meeting.
How to Create a New Label in Todoist
Before you can tag a task with a new label you need to create some! You can do this by going into the tab on the left named “Filters & Labels.” Next to the section called “Labels” click the “+” to add a new label.
Color Coding Your Labels
I also use the color codes to distinguish between my different types of labels. All of my time amount labels are in green, and all of my types of tasks are in blue.
Try Todoist Pro FREE for 2 months here!
Step 4 – Reflect
The next step you need to take in order to get things done is to reflect. Come back to your commitment tracking tool often to review and make sure you are making progress on your top priorities.
You’ll now learn how to use Todoist to reflect on all of your commitments!
Today View
The Today View is a great way to see all of the tasks you need to get done today. Make sure you take the time to create deadlines on your tasks so that this feature is helpful for you as you reflect on your day.
Todoist Filters
Todoist’s filters are a great way to help you reflect on what is most important right now. You will get the most out of your filters if you take the time to create labels for each of your tasks.
Filters do exactly what you would expect of them, they filter through all of the tasks inside Todoist. For example, if you want to look for all of your top priority phone calls that need to be made, you might create a filter to find all the tasks with a Priority 1 Flag and a label of Phone Call.
Todoist Reminder Notifications
If you want to make sure you remember to do certain tasks at a particular time or you are working on creating the daily habit of checking your commitments using the Notification Feature will be helpful!
You can easily set up a reminder for particular projects or tasks by clicking into it and selecting the little clock icon next to the priority level flag.
The cool thing about the Todoist Reminders is that you can be reminded to take action on a task based on the time or your location!
If you have the Todoist’s free app on your mobile phone the location feature is especially helpful. You can receive push notifications directly to your phone when you arrive at a location. This is really a great feature!
Step 5 – Take Action!
The best part about developing an amazing commitment tracking such as this is the satisfaction of checking off those items from your list.
How to Check Off a Task In Todoist
Checking off a task is very simple, all you need to do is click the circle to the left of the action name.
If the action you check off has Sub-Tasks, all of the Sub-Tasks will be automatically checked off when you check off the parent task.
If you accidentally check off a task, you can easily undo that by re-clicking the now filled-in circle.
How to Get The Most Out of Todoist
Search Bar
The search bar is very helpful for looking up a specific task quickly. Instead of clicking through all of your project folders, you can simply type in a few words associated with that task into the search bar.
Keyboard Shortcuts
Keyboard shortcuts are my favorite! They are extremely helpful when trying to work quickly. Todoist has a number of keyboard shortcuts you can use while the program is open on your computer, however, to really make the most out of Todoist, I highly recommend setting up a few keyboard shortcuts for your computer.
For example, when I type “Ctrl” + “Q” no matter what I have open on my computer, a task box will open up to create a new Todoist task! Genius!
Integrations
Todoist has a number of different integrations.
Some of their popular integrations include…
- Google Calendar
- Zapier
- Google Assistant
- Amazon Alexa
- Trello
- Zendesk
- Evernote
- Slack
Project Templates
The last thing to mention about Todoist is their project templates. Todoist has created a variety of templates for you to use to help you do your best work for all sorts of different projects!
For example, if you have a Youtube channel, they have a Youtube video template. If you’re just starting your budget, they have a template for getting your finances in order. They even have a template for the GTD Method!
They have templates for marketing teams, book writers, job hunting, goal tracking, wedding & vacation planning, and more!
Todoist is always coming out with new features!
Try Todoist Pro FREE for 2 months here!
Hopefully, now you have a better idea of how to use Todoist. If you still have questions or need more tips on how to get the most of Todoist, drop a comment down below!
You May Also Like
How to Achieve Your Savings Goals in 2022
Are You Ready to Start Investing?
7 Expenses That Go Into Buying a House
5 Steps to Starting Your Personal Budget


